
It's bedtime, the school bag is still open, and a teen insists the braces are clean. Then a parent notices a piece of dinner tucked beneath the wire. The toothbrush has been used, but it's hard to tell whether every bracket got cleaned.
Learning how to brush with braces becomes easier when families stop relying on a quick glance and start using a repeatable routine. A timed bedtime session, a clear route around each bracket, and a weekly plaque-disclosing check give parents and teens something concrete to check. For Delaware families considering treatment at Stellar Orthodontics, these habits are useful to understand before braces go on.
Table of Contents
- Tools That Work Best with Braces
- How to Brush Each Bracket Step by Step
- Daily Brushing Schedule and Interdental Cleaning
- Common Brushing Mistakes and How to Fix Them
- Book a Free Consultation to Check Your Routine
Tools That Work Best with Braces
A crowded bracket area can be hard to clean with a regular toothbrush alone. Choose tools by the job they do and by what the teen can use comfortably and consistently. An umbrella review of oral hygiene during fixed orthodontic treatment found benefits from powered brushes, but no single toothbrush, toothpaste, mouthwash, or interdental device works best for everyone.
A soft manual brush works well for someone who can make small, controlled circles. An electric brush can make brushing easier for a teen with limited hand control or inconsistent technique, though the bristles still need to reach each tooth surface. A small interdental brush cleans beneath the wire and between brackets.
Braces cleaning tools and when to use them
| Tool or product | Best for | How often | Practical note |
|---|---|---|---|
| Soft manual toothbrush | Gentle, controlled cleaning above, on and below brackets | Three times daily | Replace when bristles splay |
| Electric toothbrush | Teens with limited dexterity or inconsistent technique | Three times daily | Hold on each tooth surface briefly; don't scrub |
| Interdental brush | Under the wire and between brackets | Once daily, at bedtime | Angle it away from the gum |
| Fluoride toothpaste, 1,350-1,500 ppm | Preventing white spots and decay | Twice daily at minimum | Use a pea-sized amount; spit, don't rinse |
| Fluoride mouthwash | Extra protection when a dentist recommends it | At a separate time from brushing | Use it at a different time from brushing |
| Plaque-disclosing tablets | Finding missed spots | Weekly | Retained plaque shows in color |
Basic tools before stronger products
For routine brushing, use a pea-sized amount of fluoride toothpaste, then spit without rinsing so fluoride remains on the teeth. Stronger fluoride products need professional guidance. A 2025 Cochrane review found low-certainty evidence that professionally applied high-concentration fluoride foam and 5,000-ppm toothpaste might help prevent early white marks during fixed-brace treatment. Families should ask a dental professional before choosing prescription-strength toothpaste, especially for a child.
Mouthwash adds a separate step when recommended, but it does not clean around brackets in place of brushing. Use it at another time rather than immediately after brushing, so it does not wash away toothpaste fluoride.
Practical rule: Choose each tool to address a specific cleaning need rather than adding another purchase.
A water flosser can be another aid for clearing food and debris around braces. See this guide to using a water flosser with braces for practical details.
How to Brush Each Bracket Step by Step
The three-zone technique means cleaning above, directly across, and below every bracket, alongside the inner and chewing surfaces of every tooth. A consistent route makes missed areas easier to notice than random passes across the front teeth.
The graphic shows how the brush moves around the teeth and braces.
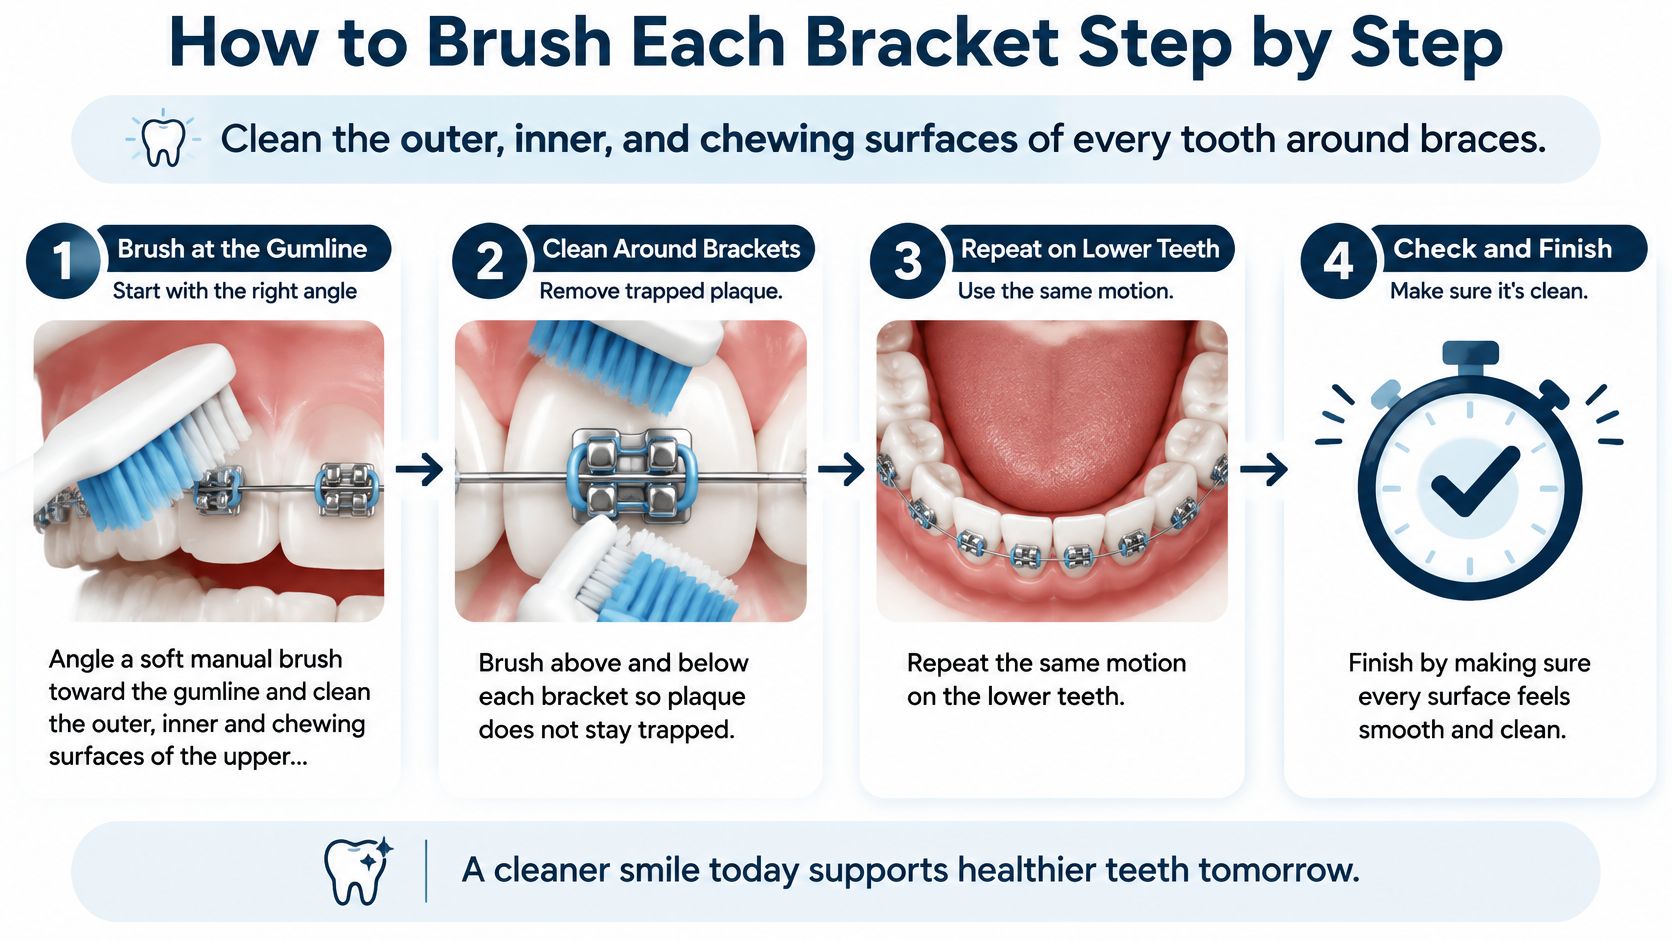
A repeatable route around every tooth
The Nottingham University Hospitals orthodontic oral-hygiene guide supports a pea-sized amount of 1,350–1,500 ppm fluoride toothpaste, brushing for about three minutes, and checking the result in a mirror.
The brush starts at the gumline. A soft manual brush angles approximately 45 degrees toward the gums, with light pressure, while the patient follows a route across the upper teeth and then the lower teeth. The route includes outer, inner, and chewing surfaces; the common slip is beginning and ending with only the visible front teeth.
Small circles clean above each bracket. The bristles point toward the gumline at approximately 45 degrees to reach the strip of tooth between the bracket and gum. Moving too quickly across this narrow strip can leave a film even when the bracket itself looks clean.
Gentle contact cleans across the bracket and wire. Small, controlled movements reach the bracket edges without forceful horizontal scrubbing. The common mistake is pressing harder when food looks stubborn, rather than repositioning the bristles.
The brush changes direction below the bracket. The patient cleans the tooth surface toward the biting edge, paying attention to the bracket's lower edge. Keeping the brush at the same angle throughout can leave this area untouched.
The inside and chewing surfaces receive a deliberate finishing pass. These surfaces still need cleaning even though they don't carry visible brackets. A rushed patient may finish the outside row and forget the surfaces facing the tongue.
The mirror check completes the session. After the timed brushing, the patient examines the bracket edges, gumline, and areas beneath the wire, then spits out excess toothpaste without rinsing. Ending when the timer sounds, without checking coverage, is the common slip.
For an electric brush, the movement changes: the patient holds the head against each tooth surface near the gumline and lets it work. The Queen Victoria Hospital fixed-brace guide specifically advises against adding a manual scrubbing motion.
The demonstration provides another way for a parent and teen to follow the brushing movements.
What the mirror should show
A cleaned bracket should have a clear, shiny surface without a removable chalky film along its edges. Parents can help younger children check each zone in turn while brushing in front of a well-lit mirror.
A persistent white patch on the tooth isn't necessarily leftover plaque. If it remains after careful cleaning, the orthodontic team should assess it rather than the child scrubbing harder.
Daily Brushing Schedule and Interdental Cleaning
A teen can brush before school, then get home with food caught around the brackets and under the wire. A daily schedule helps make cleaning repeatable, while a bedtime check and weekly plaque-disclosing check show whether any spots were missed.
The NHS braces guidance recommends fluoride brushing in the morning, at night, and after meals, plus daily cleaning with an interdental brush. Use this schedule as a practical guide, adjusting it to the orthodontic team's instructions.
Brushing schedule for a day with braces
| Time of day | Brushing | Interdental cleaning | Notes |
|---|---|---|---|
| After breakfast | 3 minutes with a pea-sized amount of fluoride toothpaste | Not needed | Spit out the toothpaste without rinsing with water |
| After lunch or a school snack | 3 minutes, when timing allows | Not needed | Rinse with water if brushing isn't possible |
| After dinner | 3 minutes, covering bracket and gumline surfaces | If food is trapped | Check the mirror before moving on |
| Bedtime | 3 minutes, covering the gumline, every bracket surface, and chewing surfaces | Required once daily | Use fluoride mouthwash at a separate time |
The daily interdental clean can happen at bedtime. If food is caught under a wire during the day, though, clear it rather than leaving it there until night.
Bedtime makes the routine checkable
Treat bedtime brushing like a short appointment with the mirror. Keep the toothbrush, toothpaste, and interdental brush together so the small brush is ready when needed. A timer can help the teen give the full session its place in the evening routine.
After brushing, guide the interdental brush carefully around each bracket and beneath the archwire. Angle it away from the gum, and never force it into a tight space. If it won't fit comfortably, ask the orthodontic team to check the size and show how to use it.
At bedtime, ask: “Did you check the gumline, bracket edges, and inside surfaces in the mirror?”
That question gives a teen a clear route to follow. The goal is to check each area reached by the brush, rather than whether the toothbrush was used.
Food timing and the weekly check
The Frimley Health fixed-appliance care guide advises waiting about one hour after eating before brushing, particularly after acidic or sugary foods, and supports a weekly plaque-disclosing check. This timing gives teeth a chance to recover after exposure to acids.
For instance, if a teen drinks juice just before leaving for school, water can rinse away loose residue while brushing waits until later. The water rinse is a temporary step, not a substitute for brushing.
Once a week, use plaque-disclosing tablets according to their directions. They color plaque that remains after brushing, turning the check into a visible map: the teen can spot a missed bracket edge or gum margin, then clean that area again. Over time, this helps families focus on the places that need more attention instead of guessing.
After the bedtime session, look for clean bracket edges without removable film. If chalky marks near the gumline remain after careful brushing, ask the dental or orthodontic team to assess them.
Common Brushing Mistakes and How to Fix Them
A teen finishes brushing before bed, but the mirror still shows film along the gumline. That's a sign to check the route, not to scrub harder. Brackets and wires create small edges where plaque can linger, so a repeatable routine needs both careful brushing and a way to spot missed areas.
The Harvard Dental Center orthodontic instructions describe holding a soft brush at approximately 45 degrees around brackets and brushing for at least two minutes twice daily. For a bracket-by-bracket route, allow about three minutes so each surface gets attention. The Harvard timing is a minimum, not a reason to stop before the full route is complete.
Brushing mistakes, what they look like and how to fix them
| Mistake | What it looks like | Fix |
|---|---|---|
| Brushing only the front of brackets | Film along the gumline or behind the wires | Follow the three-zone route, then check the gumline and the edges above and below each bracket |
| Scrubbing hard across the bracket | Irritated gums or plaque left at bracket edges | Use small circular movements with gentle pressure |
| Skipping the interdental brush | Food or film remains under the archwire | Clean beneath the wire once daily at bedtime |
| Replacing the wire without checking the gumline | The bracket faces look clean, but a film strip remains beside the gums | Look closely along the gumline after brushing and return to any missed spots |
| Rushing through the route | Inside or chewing surfaces are still coated | Use a timer and allow about three minutes for the full route |
These signs are clues, not diagnoses. Bleeding can have more than one cause, and a chalky mark may reflect an enamel change rather than removable plaque. Persistent marks deserve assessment, not extra pressure.
Habits that survive busy weeks
A timer helps keep the pace steady, but it cannot show whether the bristles reached every surface. A weekly plaque-disclosing check adds that feedback: the color highlights where plaque remains, so the teen can brush those spots again and learn which areas need a closer look.
- Start with a timer. During the first week, use one to see whether the full route takes about three minutes. Give each bracket area enough time rather than rushing to beat the clock.
- Check retained color. Use a disclosing tablet according to its directions once a week. Look for color beside the gumline, around bracket edges, and behind the wire.
- Reset after schedule changes. Sports or exam weeks can disrupt the routine. Returning to the same three-zone route helps restore consistency; brushing harder does not make up for a missed surface.
- Report discomfort. Discuss bleeding gums or persistent soreness with the orthodontist. Worsening pain or significant swelling warrants earlier contact.
Families concerned about chalky enamel changes can read how to prevent white spots on teeth with braces. A home check can reveal areas to discuss, while persistent changes still need professional evaluation.
Book a Free Consultation to Check Your Routine
At an appointment, a teen can show the orthodontic team how they brush, rather than trying to describe it from memory. The team can check whether the bristles reach above and below each bracket, whether the pressure is comfortable, and which spots are hard to see in the mirror.
Questions worth bringing to an appointment
Bring the teen's toothbrush and interdental brush, along with a short list of trouble spots. For example, note whether the back teeth are difficult to reach or the bedtime interdental brush is often forgotten. That gives the team a specific routine to review.
- Technique questions. Ask the teen to demonstrate brushing around a bracket that is hard to clean. The team can check the bristle angle and show how to reach both sides.
- Comfort concerns. Mention bleeding gums, sore spots, or an interdental brush that feels too tight. The team can help assess whether the tool or technique needs adjusting.
- Routine obstacles. Explain if school lunch, sports practice, or late dinners make a cleaning session difficult to fit in. A clear example helps identify where the routine breaks down.
Stellar Orthodontics schedules adjustment visits every 6 to 8 weeks, each lasting about 30 minutes, with the same orthodontist at every appointment. These visits are a good time to raise cleaning questions. Contact the orthodontic team sooner if a problem worsens instead of waiting for the next adjustment.
Families considering treatment can ask about locations in North Wilmington, Middletown, West Dover, and Millsboro. The free orthodontic consultation remains free whether a patient proceeds with treatment, has insurance coverage, or qualifies for Medicaid braces. Bring the brushing tools and trouble-spot list, and ask questions about both daily care and treatment.